Wednesday, August 29, 2012

The Best Ever...Salmon Burgers

Notice the Louisiana hot sauce in the background? What a coincidence. I was just mentioning on some replies on my previous post that tropical storm Isaac is in Louisiana now. Since about 1 week now, we've been having heavy winds and rain here in South Florida, but nothing compares to the windy heavy storm we had last weekend, finally ending last night with several huge BANGS of thunder that shook all the windows.

When you're stuck inside all day on Sunday and half the day on Monday, due to the storm, you better have a plan while you have electricity, to make the best of the situation. As for me, I yearn for comfort food...not necessary junk food but something satisfying...yet, healthy! I had a brilliant idea to make burgers on my little George Foreman grill...better yet, a juicy salmon burger, with robust flavor, not too spicy, but intense in flavor.

How could you not have a burger without sides?...not me! Either fries, or onion rings, but I must confess I do love onion rings...good onion rings, and I am not going to wast any time making them from scratch just for me alone when I can get the Alexia onion rings in my local supermarkets freezer section.

I even made the dipping sauce that was sweet, and spicy (recipe on the side of the bag) I adapted it my way by adding the Louisiana hot sauce to kick it up a bit. No frying with these onion rings. Just bake it for 10 minutes on 400 degrees F. for a crisp perfect, crunchy onion rings that were dipped in Panko crumbs.


You must have tartar sauce with a delicious salmon burger...if not a tartar sauce, but then a special sauce. Now I have both, a ketchup based sweet and spicy dipping sauce, and a homemade tartar sauce that is way better than the store bought!

I was so inspired to make the tartar sauce that I have been making for years, which is really a simple method. Just have a good brand mayonnaise, and to make sure you add sweet pickle relish, or make your own pickle relish by chopping the pickles in your food processor.

So let's get started. For 2 salmon burgers, I used a piece of salmon fillet that was just under 1/2 lb.

2 scallions, trimmed and chopped coarsely.
2 or three pieces of fresh dill, stems cut
1 teaspoon lemon zest
juice of half of a lemon
1/4 cup Panko bread crumbs
freshly ground pepper, and sea salt to taste
(I used coarse sea salt ground fine)
Cut the salmon into 1 inch cubes, and add it to a food processor, adding all the listed ingredients.


Being careful not to process; just give it no more than 2 pulses, to keep it coarse, and not make it like ground meat. The Panko will help it hold together.

Have your grill set up, or your favorite grill pan or electric grill heating up.


This is the ideal consistency you should have. (my only problem was, I should have chopped the scallion into smaller pieces) food processor does not seem to chop it up in 2 pulses.

Now you are ready to pat them gently into patties.


On a large plate, add 1/4 cup more of the Panko crumbs and roll the salmon burgers in them. Gently pat some extra on each side.

Spray with PAM or other brand cooking spray on both sides. At this time, you can refrigerate them while you prepare the other easy sides to go with it!


Grill the salmon burgers on the George Foreman Grill, which of course has two sides for grilling which takes half the time than grilling in a grill pan, or on an outdoor grill.
Spray extra cooking spray while you're grilling,


Total time on George Foreman is 4-5 minutes. On a one sided grill you have to flip over to the other side. (4-5 minutes on each side)

Dipping Sauce for the onion rings and for the salmon burger (optional)

1 cup good quality ketchup
(I use Heinz)
1 teaspoon taco seasoning
1 teaspoon cocoa powder
few dashes of Louisiana hot sauce
Mix all the ingredients together in a small bowl and serve for dipping, or spreading
.


Linking to:Full Plate Thursday @ Miz Helen's Country Cottage
               Thursday Favorite Things Blog Hop @ KatherinesCorner


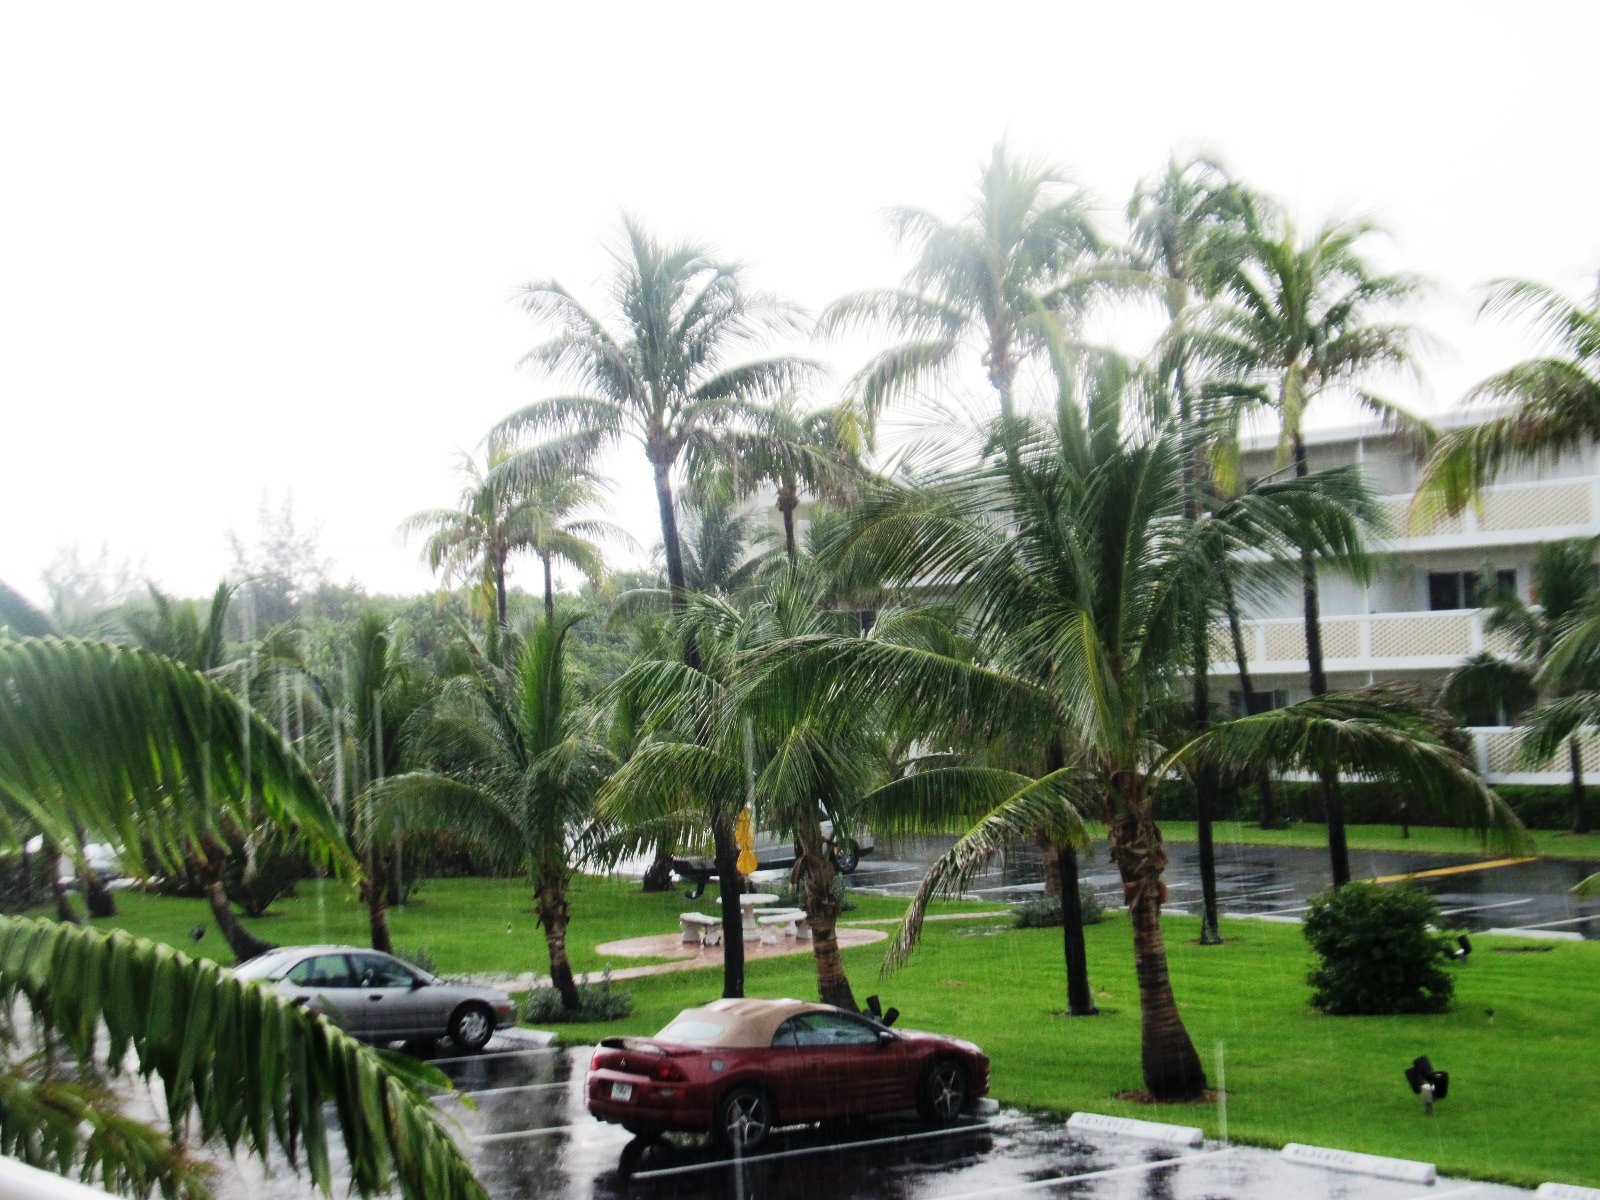
I happen to snap this photo on Sunday. right in front of my T.V. surprised that the photo actually came out!
You can see the danger warning in red, and check out W. Palm Beach. On the right side of the line...next to the blue color, is where I reside, right smack in the way of the tropical storm. This is the first time I've experienced such strong tremendous winds and rain in all the years I've lived here...of course in another location, way west, but that area had the bad flooding this time.
Some beach "gawkers" viewing the rough waves. (I took this photo from my balcony, just in time before we had a huge rain downpour. Never fails to have thundering and several lightnings here. The thunder is so loud it shakes your doors and windows...no kidding. The main thing is we got through it without harm or damage other than objects flying around, and tree branches torn.


Lastly, I need to get your attention to something really important! The most annoying Word Verification! I borrowed this helpful widget from my friend Brad, @  Here to Ann Arbor, to make a point. Question:
Has any of you bloggers noticed the new type of word verification that is next to impossible to read the mumble jumble words?...or is it just me!

For the last 2 weeks the word verification has not let me send my comment through to your blog. I have a list of at least a dozen now...some of you I have notified, and you fixed the problem, and some of you promised to fix the problem, Jo, Kathy and Zsuzsa... so that I can comment but I'm still finding more with the same issues!

For some reason Google is doing this to me...blocking me, or maybe the Word Verification people; whoever they are! I've even replied back to Lena, and Zsuzsa on my blog, sent an e-mail letter to Michael, and tried to leave a comment today on Cucina 49. So, if any of you bloggers has this word verification, now you will know why you are not getting comments from me, and in some cases I have no way of contacting you to let you know.
So that's all from my ramblings.


Enhanced by Zemanta

Saturday, August 25, 2012

Plum Upside-Down Cake


Since I've been food blogging for the last two years...I have not been thinking about that I would actually say,
"I have to bake something for my food blog"...hmm! wonder why did I say that to my daughter Lora, yesterday morning?
She told me the other day that her food blog is getting to be expensive...well, the reason for that is: She bakes every single day...really! There isn't a day that goes by when she does not bake...if nothing else, but the 'staple' banana bread, or homemade pancakes!
I was hoping to get this post up by yesterday...Friday, knowing that I did not have anything else worthwhile to post and that I don't do much baking cakes...although I love to put simple and yummy quick and easy desserts together!
We have such an abundance of plums...not the deep purple Italian ones, but the round ones which are so perfect just by themselves to snack on (which I did eat 3 yesterday)...and decide to make something with it. No time to start browsing through my cookbooks, old recipes, or favorite food bloggers' recipes...so what do you do first, if you don't have the basic recipe on hand?...The Internet...yes, that's the fastest way to google a recipe and do some adaptations of your own, which I did a little on my cake. Since I made this for my blog...still smiling to myself
about that one, I only kept one large piece for myself and shared the rest with my family.

Yesterday was such a stormy day on-and-off, with tropical storm Isaac on our heels by Sunday night...hopefully it's not turning into a hurricane!

Good day to be cooking and baking when you're stuck inside. I did go out on my balcony to take some photos of the beach, the clouds, and no less than 30 minutes wind, and a storm, but the worst is yet to come! We'll just have to be prepaired and be safe.

As you see, for my baking, I like to chose a comfy-cozy home type of dessert. For me they are super easy to make, and I do believe it will be easy for you, if you follow my easy and handy little tips. Don't let the layering of this beautiful upside-down all American simple cake intimidate you...and I DO recommend that you make this from 'scratch' and not from a mix, although I do use cake mixes, only to 'doctor' them up!
Here's the link to this awesome and easy cake!

Plum Upside-Down Cake 


Plum Upside Down Cake...click on, for the recipe

I did very little adaptation. I omitted the honey! The 1 cup of golden brown sugar was just right...no need to have it sweeter, and the glaze from the sugar and butter worked out fine. If you don't have a cast iron skillet that you could bake it in, just proceed with the recipe.

My cast iron skillet is an "Emeril" brand (not thrift find)
purchased it online from the HSN home shopping network! A 9x9 inch corn bread skillet, or for any other cooking...already pre-seasoned, so you don't have to do all that, just maintaining it!
I also sprinkled some cinnamon powder on the top of the fruit, that the recipe does not call for.


First, start out with the dry ingredients to mix together in a small bowl...then with an electric mixer, mix your butter with the sugar, (I used 1/2 cup sugar) less than what the recipe calls for, which is 1 cup.

Add the eggs, one at a time while mixing. Alternately add the flour, and the milk, mixing it into the sugar-butter mixture until it has a nice thick creamy consistency, as in the photo.


Make sure the oven is preheated to 350 degrees F.


With a plastic, or rubber cake spatula, spoon on top of the fruit...making sure to cover the entire fruit...caution!
this is NOT  a Cobbler mix, it is a CAKE batter...so be sure to cover the entire portion...being careful to spread the batter and not to push it down into the fruit and the glaze, disturbing it!


Using a rubber spatula will make it easier for you to scrape out all the batter from the bowl.


Well...we're getting there!


Try to get the batter as close to the edge of the pan, as possible. I was already concerned about the batter sinking into the fruit mixture...which some will, at baking time, but that's the beauty of it.


My actual done cake...is not uploading...but here's the finish part where you invert the cake over your serving platter:

Here's the real great TIP: Bake at 350 degrees F. for the first 30 minutes...lower the temperature to 325 d. F.
for an additional 30 minutes. If your oven is correct, than that is the exact time you need. When you take cake out of the oven, let it sit in the pan on top of a metal rack for 30 minutes. Make sure to take a dull knife to go around the cake to loosen it, before inverting it!


Just look it the golden bronze color of the fruit, and the part of the cake! Moist, perfectly sweet, and over the top delicious, that you will impress your family and your guest with...even more; Impress yourself, and pat yourself on the shoulder! Great job! Looks like you slaved away for hours making this amazing cake...but you know you didn't!


The cake is super easy to make...only takes 1 1/2 cups of all-purpose flour...that is why it isn't taller, but that is the correct portion you need. Just make sure you have enough fruit overlapping..


A little close up...just to try it out...I took a bite from the piece I saved for myself...and could not stop eating it. BTW-best way to serve this would be still warm! With a scoop of vanilla ice cream (which I didn't have...and you're in 'heave'...well I already felt like I was there...incredibly yummy! Did I convince you now to make it?...you can substitute fresh peaches if you don't like plums!
So, I'm guilty...but happy guilty...could not resist just one bite, or even half the portion...had this super  yummy cake for lunch, with a tall glass of ice cold fat-free milk!

More for later...will let you know how our weekend went with ISAAC...and on Monday paying us a visit!


Enhanced by Zemanta

Monday, August 20, 2012

Mango-Strawberry Cobbler

Some cobbler have toppings that are actually as thick as biscuits, but to me it's patches of a crusty dough that has a cake-like flavor on the inside. I've been making all kinds of cobblers that is so easy, and so nice with fresh fruit that you want to use up.
Although, I did just state in my previous recent post that mango season is over in S. Florida...it really is over! This was the best mango season for us in years, and we were so blessed with all the abundance of these lovely tropical fruit, that we just had to use it in so many ways.

Last week, the final 4 mangoes fell down from the top of the tree and they were almost too ripe. Didn't want to use them for smoothies...it would be so selfish when we had smoothies just about every day for one month. I have not made a cobbler, since about one year ago, and it's time that I make one.

I made the cobbler this afternoon, and I was so very happy that we had beautiful sunshine today, but very, very, hot. Today was the first day of school for most of the kids in our area, and both my grandchildren started back! The weekend also went so nice with perfect Florida weather...rain again, in the late afternoon, but during the day was gorgeous and sunny!

Cobbler has got to be the easiest and fastest dessert to make...you just have to remember, that it starts out with 1 cup of flour, a little sugar, dash of salt, and don't forget the baking powder, and of course, a little butter, moisten it with either a little bit of milk to form a dough, or a little over 1 cup to be able to drop the dough on the fruit, and bake for 35 minutes...Let me tell you, the best way to eat this amazing cobbler; while it's still warm. This was gone so fast that I must say I will be making it more often now, with different fruits!
 I wanted to show you close up how juicy the fruits are (I have a little secret for that)...and for the cobbler, you can see the thickness, which is just right, and see how moist it is, yet has a crusty top!
This is my favorite photo...Gabby enjoying her cobbler, for an afternoon snack. She had her first day of school, 6th grade, and she came home so happy...all smiles, and such positive energy and lots of stories.If you want to make your family happy, with the most perfect, easy, afternoon snack...make them a fresh fruit cobbler...they will love it, and 'thank you' for it!  Now, on to the recipe...click on read more...(as if you didn't know it!?)

linking to: Hearth and Soul @ Zesty South Indian Kitchen


Mango-Strawberry Cobbler
recipe by: Elisabeth

Topping:
1 cup all purpose flour
1 Tbsp. sugar
dash of salt
1 1/2 teaspoons baking powder
3 Tbsp. cold unsalted butter
1 1/4 cup milk
Confectioners sugar for dusting

4 ripe mangoes
peeled and diced small
1 cup cut strawberries
1 teaspoon ground ginger
1 teaspoon ground cinnamon
1 Tbsp sugar
juice of 1 orange, and 1 1/2 teaspoon corn starch mixed in a cup with the orange juice. Add enough water to make 1/2 cup


Preheat oven to 350 degrees F.
In a 9 inch square pan, or an oblong, or a favorite ovenproof glass pan, combine the fruits, with the ginger, cinnamon, and the orange juice corn starch mixture, and toss lightly.

To prepare the topping, combine flour, sugar, salt, and baking powder in a small bowl. Cut the butter in small pieces, and with a pastry blender, or a fork, mix into the dough, until it forms a crumblike texture. Slowly add the milk and mix lightly; it still will be crumbly in texture, but that's how it should be.

Dollop the topping with a large spoon (I use and ice cream scooper) unto the mango mixture. You can spread the mixture... or leave it as a dollop, not to cover the surface.

Bake for about 30-35 minutes until it gets a light brown color, and the fruits are bubbly and thickened.
Dust with confectioners sugar, and serve warm.
Serves; 5 or 6
Enhanced by Zemanta

Friday, August 17, 2012

Chocolate Balsamic Strawberries

Another TGIF...and I feel I've been so neglectful in cooking, or baking something for a new post this week. Too busy eating lunches and dinners at my daughter Lora's.

 For instance, her amazing sourdough pizza that she made yesterday and just posted it...you gotta check out her Sourdough Pizza Margherita...as for me, all I could come up with for today, is a fabulous quick and light strawberry dessert that I made, and photographed at her house...playing 'tag' with the sun coming in and out!
It's been over a year now, that I have received an amazing giveaway gift set of fantastic walnut olive oil, chocolate balsamic vinegar, seasonings, and spice rubs. from ARTISANO'S  via my dear friend Lizzy! I have not opened the chocolate balsamic vinegar...until now, even though I know how amazing it is on strawberries. I did make balsamic soaked strawberries before, but nothing like this particular one!
I've been reading  quite a few recipes from my Hungarian food blogger friends...especially GIZI who happens to make a lot of desserts with mascarpone and whipped cream...'hmm'...I thought to myself; why is it that I have not seen a whipped cream incorporated with mascarpone?...what's so hard about it?...it's done the same way as if you are whipping cream, adding a little sugar and vanilla, to the mascarpone, and the cream...I'll tell you, it is pure HEAVEN! My 6yr. old grandson, took a soup spoon and was totally eating the cream...like 'no tomorrow'...I had to remind him that we need to save it for the dessert!

Here's the most amazing chocolate balsamic vinegar that I have ever had the pleasure of using it for my amazing simple strawberry dessert. Here's ARTISANO'S website, to check out there amazing products, and to order online to be shipped to you! In any case, I will post the recipe, including making your own chocolate balsamic vinegar...just from my own experience from the past!

Chocolate Balsamic Strawberries
created by; Elisabeth

1/3 cup chocolate balsamic vinegar
or regular balsamic vinegar and 1 Tbsp of
dark cocoa powder
2 teaspoons, plus 4 Tbsp. sugar

8 oz container of mascarpone cheese
8 oz. container of whipping (heavy) cream
1 teaspoon vanilla extract

1 large basket of fresh strawberries...about 24 ozs.
hulled, and halved


Combine vinegar, (cocoa powder) if you don't have the chocolate balsamic vinegar, 2 teaspoons sugar, in a heavy small saucepan. Stir over medium heat until sugar dissolves.

Boil, until syrup is reduced to scant 1/4 cup, about 3 minutes. Transfer to a small bowl; cool completely.

For the cream:
Combine mascarpone cream, vanilla, and 2 Tbsp. sugar in a large bowl. With a hand held electric mixer, beat until soft peaks form. Combine berries, and remaining 2 Tbsp. sugar in large bowl. Drizzle with balsamic syrup and toss to blend. Let stand for about 30 minutes, stirring occasionally. Divide berries and syrup among 4 dessert glasses. Top with mascarpone cream. Yumm! 

Just to let you know how the weather is in Palm Beach at the end of the afternoon...just about every day! Huge rain clouds, and a quick soft rain...or a short storm! Have a wonderful weekend! xo


Enhanced by Zemanta

Monday, August 13, 2012

End of the Mango Season in S. Florida

I'm not trying to bore you with more mangoes...but this time, I just want to share with you the last of our mangoes and the  Mango Jam recipe that my daughter Lora and I share. My recipe calls for lemon juice, which her Italian recipe does not, but from the last batch that I made she like the slight tangy lemon taste...this time, I used the juice of fresh lime, and that even made it taste better!
I'm going to share my little secret of how to can jams perfectly and to make sure they stay sealed, tight. You have to hear that 'pop sound' when you twist the jar to open...otherwise its not sealed right! I could never do this kind of work in my tiny beach condo kitchen, now you can understand why I spend just about every day at my daughter's house...not so much because she has a much larger kitchen, but because they have plenty of counter space and the kitchen is open and well lit! Also, the patio has ample natural lighting as well. I made this batch last week, and hoped I would catch a little sunlight that was 'sneaking around' for a short time...then the rain came!

I will guide you through the easy process...although a little time consuming, but I promise you that you can make this with the half of the amount from the full recipe!

This is what 1 kilo (2.2 lbs) of fruit will allow you to make. These are 12 oz canning jars with lids, that have to be sterilized (just run it through the dishwasher cycle lid too) or boil in a large pot of water, and let it cool to the touch.

You can make this with other fruits...peaches is what I would love to make it with, hoping that the price will come down from $1.99 a pound, we will probably get it less at our local produce market. Plums would work well also, for this recipe.

I used Sure-Jell pectin for my previous batch, but this time I use my daughter's Italian pectin that comes in a big pouch, so I counted out how many Tablespoons it requires, and marked down everything on paper to be saved, so good thing that I'm actually typing up this recipe and method to save for myself too!

With a jar of leftover mango jam, I also made cream cheese bars filled with mango jam

Mango Jam
adapted from Italian basic jam recipe

2 kilo (4.4 lbs) mango, or other fruit
750 g.(about 2 1/2 cups sugar
juice of 2 lemons, or limes
5 Tablespoons pectin (I used Italian import)

note: you can cut the amount exactly in half if you
want to make less jam.

Wash, peel, and dice the mango, or other fruit, and put into a large bowl. With a potato masher mash it well, but leaving little chunks of fruit which is really very tasty.


Add the pulp of the fruit to a large heavy stainless steel, or other heavy duty pot. Add the sugar, the pectin and the juice of the lemon or lime, and simmer constantly, over med. high heat.


Make sure you keep stirring, constantly, until it comes to a bubble and a slow boil. You must take it off the heat as soon as it does that, and start getting your jars ready to be filled by the hot jam. Don't be alarmed that it looks liquidy, because it will start to jel, as soon as it starts to cool a little.


With a ladle, carefully spoon the jam up to about where the neck of the jar is, to assure it will not spill over...do not fill to the very top!


Just set them on a dish towel making sure the lids are well sealed, and here comes the tricky part that will assure double seal!


Turn the filled jars upside-down, and leave them sitting like that for about 10 minutes to assure safe sealing for the lids. You can also do a water bath in a large pot with water only up to half way, and simmer for 10 minutes, or just follow this method!

note: if you are planning to leave jams in a cool place in your cupboard, then you have to do the water bath method...otherwise just proceed with this method, but you must refrigerate after opening the jar...either way, when you open a jar of jam you must refrigerate it!

Jam is done...now you can go 'jamming along'...a cool song of Bob Marley...Jammin!

Enjoy the jam...and share, sparingly...it's that GOOD!

Linking to: Thursday Favorite Things @ Katherines Corner


Yesterday was such a lazy day...raining most part of the afternoon, but the nice gentle comfortable warm rain, that did cool down the temperature. I did not want to venture out driving in the rain, so I decided to walk around on my 2nd. floor condo unit and snap a few pictures. Don't you agree this looks like a painting?...perhaps a gentle water color?...well, this is how the beach looked. Gentle rain, the sky...you can't even see what color...gray ocean, but pretty!
The beach scene is the east view, and the parking lot is the west view...the building facing, is across the street, and behind that building, is the Intracoastal waterway...I love the gentle rain, especially when its quiet...no one around, everybody is still out of town, state...out of the country; this is South Florida living for the ones that stay behind, like me!
Quiet and serenity is something that we all require and need from time-to-time to re-energize and recharge our senses and feelings. Rain is needed in much part of the U.S....the drought is not good; for some reason we were fortunate this year...no hurricane, but who knows what next year will bring!
Hope you don't think I have 'no life'...ha, ha...seriously, I just wanted to share some of the beautiful nature to share, whether its 'sunshine, and roses'...or a 'cloudy and rainy day'...this is my little haven, that I enjoy, and worked for for so many years 30+...and I'm still 'alive and kickin'...gosh I'm sounding like a song now!

In the meantime, while I had all this time on my hands on a rainy Sunday afternoon...I decided to make something easy, and yummy at the same time...did grill a tilapia fish with my jerk seasoning, and grilled a potato, first nuked, and cut in half to grill on the George Foreman grill. One suggestion, the jerk spices are extremely hot on a delicate white fish...made some fresh coleslaw, with Marzetti's slaw dressing...love, Marzetti's...always have! The fish was so spicy, I could not cut the spice...was sneezing, coughing...but I loved it! (no photos)

Next, I made these cute little bars, with my mango jam...a leftover one from last month. Tried to drizzle it with some melted chocolate, but wasn't enough, and too thick, so I gave up on that, but those little bars with the oats crust and cream cheese topped was really great!
I did follow this recipe...just don't use a 13x9 baking pan...an 8x8 inch brownie pan is plenty big enough!
I used my mango jam instead, but you can also use your favorite jam to make these yummy bars...and oh, DO use an aluminum foil or parchment paper to line and make sure to hang over the sides of the pan for easy removal, otherwise you will scratch up your pan. I forgot to use lining paper, but used a plastic spatula to cut and remove the bars.
A 'store brand' product will always saves you money, such as flour sugar, milk, and any other store brand products. This flour is great, but when I want to do some serious baking, I will always use King Arthur brand, but our local supermarket brand products are superior, fresh, and just as good if not better than some national brand you just pay for the name!
The oats, flour, sugar, and butter crust that you just mix together, and pat it down into the pan, was so ridiculously easy...pre-bake the crust for 15 minutes, then spread jam on top, and 1-8 oz. Philadelphia cream cheese mixed with 2 eggs, a little sugar and vanilla...beat till creamy, top with the cream cheese topping and bake for an additional 20 minutes. Really satisfies your 'sweet tooth'!

So that's it for today, hope you all had a wonderful Sunday!


Enhanced by Zemanta