Friday, September 28, 2012

Corn and Potato Chowder

It's only been a few days that I have not been around...not commenting to all you dear friends, and not linking to my favorites...Hearth and Soul Blog Hop @ Zesty South Indian Kitchen for Tuesday...Thursday Favorite Things Bog Hop @ Katherines Corner and Full Plate Thursday @ Miz Helen's Country Cottage...  so, I'm hoping that I'm not too late to be linking my post this week!


I made this incredible Corn and Potato Chowder, from ingredients that I had on hand, and seriously....no recipe required. If you have chicken or vegetable broth on hand, either homemade, or for me; preferably with soup base, or in a 32 oz Swanson brand. carton of chicken broth which is 100% natural...best of all, 99% fat free and no MSG added.


My week was like a blur and just sped by so quickly. On Tuesday of this week I was woken up to about 10 huge FPL (Florida Power and Light) trucks, doing a major work on our electrical system, so naturally, they had to shut off all the electric in the entire building. I just had to leave for the day, and not return until later...not realizing that my computer was entirely down, as well! When you have the advantage of getting someone else's computer (a real nice one of course)...my son gave me his computer 3yrs ago, and left quite a lot of programs of his own in there, along with my programs, it sure has been over crowded....so I let him work on it to take most of his programs out...now, my Microsoft picture viewer and editor is missing, (luckily before these photos were edited)...and for 2 days I could not use it entirely.

What happened to the good old days?....really, only about 10yrs ago when no-one had a food blog until maybe since 2005, and now, I can't even imagine life without having to (forget about my own)...check out food blogs for their latest post! Wow, life sure has changed in a matter of a decade...oh yes, it sure has changed. To think I'm a grandmother of 4 beautiful children, the oldest, just recently turning 11. Life is a treasure, and we should enjoy all the changes, surprises, and continuous adventures, not 'sweating the small stuff'...and face trials and tribulations head on, as well. There's a saying; 'Deal with it!'...so here I am, dealing with it all!


Corn and Potato Chowder
recipe: by, Elisabeth

1-32 oz. container of chicken, or vegetable broth,
or 2-15 oz. cans of the same...or your own homemade chicken or vegetable broth
2 or 3 medium potatoes peeled and diced small
1-12 oz.(about) frozen corn
or 1-14 oz. canned corn
2 Tbsp. extra virgin olive oil
plus 1 Tbsp. for finishing
1 med. onion chopped
2 cloves garlic chopped
2 carrots scraped and diced
2 stalks of celery diced
1 sweet red bell pepper diced
1 medium tomato diced
fresh parsley, or dry (a small amount)
fresh thyme, or dry (a small amount)


fresh rosemary, chopped (just a small amount)
Do not use dry rosemary...just omit, if you don't have fresh!
1 cup (8 oz.) half and half cream
2 Tbsp. flour, mixed in with the cream

In a medium or larger size pot, saute onions, garlic, and celery, until onion is wilted. Add the red bell pepper, and tomatoes and stir. If you're using dry herbs, add them as well. Give it a good stir.(For the fresh herbs add them at the end.)

Add half of the amount of broth, salt and pepper to taste, and let it come to a boil on high heat.
Lower the heat to medium, and add the remaining broth.
Simmer until vegetables are tender, but not mushy.

Now you can add the corn, which will only take about 5 minutes to cook, of frozen, or to heat up if it's canned.

At the very end of the process, add the half and half cream with the mixed in 2 Tbsp flour. You can use a mesh strainer to assure a smooth texture. Just stir, to incorporate (do not boil) heat up till its thickened, and add your fresh herbs. Adjust seasoning at the end, if needed.

If you like corn, and potatoes, and a creamy comforting soup...do not miss this one! Also vegetarian...a wonderful soup 'for the soul' ...and perfect for welcoming the fall...even has the fall colors of reds, orange, and yellow, just like the 'turning leaves' on the trees. Fall is one of my very favorite seasons!

On Yom Kippur Eve Tuesday...all day without electricity, 2 more days without computer use, and service...what a beautiful way to say a prayer for family, friends, and pray for forgiveness, and PEACE...SHALOM!
An unforgettable view from my balcony, in Palm Beach Florida, where the sky always weaves its 'magic'...God's Glory...and Mother Nature's painted sky!
Enhanced by Zemanta

Saturday, September 22, 2012

Fresh Tomato Tart with Gorgonzola Cheese


As I have mentioned in my 'Silent Sunday' post, I made this beautiful rustic Tomato Tart...normally, I would have used a milder cheese, like Goat Cheese or a mild Cheddar Cheese but I had a block of sweet Gorgonzola cheese, imported from Italy that worked wonders to balance out the flavors with just a small amount of chopped parsley
and the perfectly ripe tomato slices
I may not make cupcakes...especially with 'fancy-schmancy' frosting and decorations; although I think they are gorgeous...and that reminds me of my dear sweet friend Joanna from
Chic& Gorgeous Treats...(whom I had the pleasure of meeting in person last year, in S. Francisco) she is every bit beautiful, sweet, bubbly and friendly in person...  as she is on her blog! Check out her most amazing blog that will put a smile on your face and will want to make, or wish you would/could make some of her creative desserts, cupcakes, and mini tarts.

At least Jo's tarts and cupcakes have natural fruit and fresh cream toppings, but some bloggers make cream frosting for cupcakes which are oh, so pretty and decorative, but the first thing a child would do is to lick off the extreme sugary and brightly tinted cream!
 
Just to give you an example, last week my little grandson Luca was crying at his kindergarten class at lunchtime because every child was enjoying their cupcake topped with a fancy blue frosting, and he had to tell his teacher he's not supposed to eat the cupcake. (he previously got sick from the colored butter cream before)

My daughter had to go to school to console him because he just kept saying "I'm not supposed to eat this"...the poor child is so allergic to so many buttery and synthetic products, that he already knows at such a young age what not to indulge in...even though he would like it, but his little tummy would not tolerate it!


So, let's get started on this recipe! The tart recipe is from Lora @ Cake Duchess from one of the Julia Child's baking challenge with Dorie...another challenge that I'm not following...but maybe, one of these days...soon:)

Torta Salata-Mixed Vegetable Galette

made in a 9 inch round removable bottom tart pan

Galette Dough...(I used it for my Tart Dough)
From Baking with Julia by Dorie Greenspan
serves about 4 people


1 c.  all-purpose flour
1/4 c. cornmeal (I used plain cornmeal)
7 Tb. cold butter
1/3 c. ice water
3 Tb. sour cream


Galette Dough
 
Stir flour and cornmeal together.  Cut in butter with your fingertips until butter is in pea-sized lumps.  Stir ice water and sour cream together in a small bowl, then add to flour mixture.  Mix together with a fork until mixture holds together and form into a ball.  Put ball on a piece of plastic wrap, loosely gather plastic wrap around it and twist, then press dough into a disc. Refrigerate for one hour before rolling out.  Roll out on a floured surface till dough is about 1/8″ thick.  Fold into quarters and transfer to baking sheet.  Unfold and fill. You could also make the dough by pulsing in a food processor.

Remove the dough. Squish the ball down flat and wrap it in plastic and chill for at least 2 hours. Preheat your oven to 350 degrees F. and proceed to make filling.

For the filling:

2 large tomatoes sliced (not too thin, or thick)
8 oz. piece of Gorgonzola cheese, or a cheese of your choice that melts...you can use goat cheese, Swiss cheese, white cheddar, or just use the custard filling.
a handful of fresh chopped parsley

1 cup heavy whipping cream
2 large eggs, slightly beaten with fork
1 shallot chopped, and sauteed in 1 Tbsp olive oil
salt and pepper to taste

In a shallow bowl, add 2 Tbsp olive oil, and dip the tomato slices in them. Sprinkle with salt and freshly ground pepper. Add the 2 beaten eggs to a medium bowl, add the cream, and finally the sauteed shallots. Stir the chopped parsley into the cream and egg mixture.

Do not add the tomato slices until the last 10 minutes of baking time...very important!


Now, you're ready to bake the tart in the preheated oven, for about 25-30 minutes...just keep checking to make sure you don't over bake the tart with the filling.


During the last 10 to 15 minutes, take the tomato slices out of the oil, and pull out the tart from the oven, to place the tomatoes decoratively over the top, and finish baking the tart.

Note:
Now, do you see what I mean? This gorgeous tomato tart is right out of the oven, the tomato slices stayed juicy, and just the right softness, thanks to dipping them into the olive oil first, and only baking them on top of the crust for the last 10-15 minutes...any longer than that, will shrivel up your tomato slices; especially if you don't dip them into the olive oil!


Enjoy a nice slice of this super delicious savory rustic Fresh Tomato Tart...guaranteed success!


The filling is absolutely divine, with the custard mixture and the perfect cheese melted, and baked to a delicate golden color!
 ...and last but not least, Do include your children, or grandchildren whenever possible to join in the fun with the dough. They do have a pretty good idea of what they want to make!

As you can see what I was talking about...check out my little grandson's delicate skin and complexion...he has a lot of allergies to foods, and mostly sugary things (such as colored butter creams)...no wonder he is safer eating and enjoying savory, or even sweet fresh tarts, and homemade cakes that his mom makes just about every day, and the entire family stays 'thin'...because they eat healthy and delicious fresh, and organic vegetables...and oh, yes, pasta just about every day!
Have a wonderful weekend everyone, and enjoy you fall weather...a great change. As for us, rain, rain, ...and more rain, along with some sunshine...a nice 77 degrees F. as of right now! Hugs to you, from South Florida! xo


Enhanced by Zemanta

Tuesday, September 18, 2012

My 'Award' Winning Pizza for #Twelve Loaves September

Does it seem like I'm the only 'oddball?'...seriously! I do everything differently than the other fellow food bloggers. I'm so 'lame' when it comes to joining a group, or even linking up something. Not consistent, and certainly always falling behind schedule. I did try to link up last week with my Cheddar Cheese bread for Lora's #Twelve Loaves September, which required a cheesy bread, but did not know that pizza applies...and I did make my own dough this time with the most amazing yeast from RED STAR, called PLATINUM!

linking to:#Twelve Loaves September @ Cake Duchess
              Hearth and Soul Blog Hop @ Zesty South Indian Kitchen
              Full Plate Thursday @ Miz Helen's Country Cottage
              Thursday Favorite Things Blog Hop @ Katherines Corner


...again, I chose to be alone...needed some quiet time to 'reflect'. Not exactly a holiday dinner; since it was Rosh Hashana Eve! My daughter had a beautiful celebration at her house with their best friends and family, and I was just not in the mood for more work in the kitchen, so I did not join!


I'm so unlucky with yeast, even though it has the proper dates for the expiration...somehow I tend to mess it up. The last time I know it was too hot water, that I added the yeast to dissolve. This time I made sure that the water was slightly warm, and it worked! (sorry, no photos of my step-by-step direction, was not going to use this post)

I am so overly critical of getting a good crust for my pizza, that I'm so picky when it's home made. For me, it has to have a good rim, and it has to be baked just right...actually, pre-baked which I strongly prefer, in order to get a good crunchy crust, not to have it soggy, or greasy, and WORST, underdone!

I have a few really good pizza dough recipes, including a whole wheat dough which is softer, than the regular unbleached white flour pizza dough. We prefer the traditional dough, and this recipes is so easy...so basic, saved from 1998 Gourmet magazine, which I am happy to share with you!

Basic Pizza Dough

For a 12-inch pizza

1 packet of Red Star Platinum dry yeast,
or your favorite (abt. 1-1/2 teaspoon)
2/3 cup warm water
2 cups unbleached all-purpose flour
(I used King Arthur)
1 teaspoon salt
olive oil for the bowl

Sprinkle the yeast over the water. Let stand 1 minute, or until yeast is creamy. Stir until the yeas dissolves.

In a large bowl, combine the 2 cups of flour, and the salt.
Add the yeast mixture and stir until a soft dough forms. Turn the dough out onto a lightly floured surface and knead, adding more flour if necessary, until smooth and elastic, about 10 minutes.

(you can skip all this process, by adding all the ingredients in a bread machine, on DOUGH setting, and let the machine do the work for you)

Lightly coat a large bowl with oil. Place the dough in the bowl, turning it to oil the top. Cover with plastic wrap. Place in a warm, draft-free place and let rise until doubled in bulk, about 1-1/2 hours.

Punch down on dough, and flatten with your fist. Spray your pizza pan with a non-stick cooking spray. If dough is sticky, you can add a little more flour, just do not knead any longer. Cover the dough with a dish towel and let it soften, to expand for an additional 30 to 45 minutes. At this time, you can stretch the dough all the way to the rim of the pizza pan. Lightly spread olive oil on the dough, and pre- bake for about 10 minutes, in a 425 degree F. oven on a pizza stone (preferably) to assure a good crusty dough.

At this time, you can leave the dough to cool down, and use for later, or proceed with your favorite topping for the pizza, to bake for an additional 10-15 minutes for the sauce, to set and the mozzarella cheese melt and slightly brown.
I strongly recommend a good quality pizza sauce, such as Dei Fratelli which is a superb quality. Just be sure to add to a small bowl, and stir about 1 to 2 Tbsp. olive oil and your favorite spices. (I used an Italian brand, a gift from Italy by Lora)

For a fresh mushroom, sliced red onion, and pepperoni topping:

Saute about a handful of fresh sliced mushrooms along with sliced red, or regular onions, just slightly...set aside.
In the meantime, spread the pizza sauce, thin, or thick on the pizza, not quite to the outer rim. Sprinkle with shredded mozzarella, divide the mushroom mixture, and bake for 10 minutes. For the addition of the pepperoni slices...make sure to add the pepperoni slices at the last 5 minutes, (otherwise they will shrivel up and dry out!)
Leftover pieces of pizza can be reheated, or eaten cold (which I love)...the next day...Enjoy!

So there, you have a perfect 'Award' winning pizza, made with love, and Red Star PLATINUM yeast!
BTW- I still have to post my awesome Fresh Tomato Tart recipe, for the next post...just remind me, if I forget. xo

Join Lora, Barbara and Jamie with the #TwelveLoaves baking project!

 The month of September is about bread and CHEESE! Who doesn't love bread and cheese? You could make a quick bread or yeasted bread (muffins, scones-PIZZA)and link up to the girls. I attached Lora's link for you to see the pretty pull-apart bread she baked.
Enhanced by Zemanta

Saturday, September 15, 2012

Fresh Tomato Tart...and Silent Sunday!

My amazing Fresh Tomato Tart with Gorgonzola Cheese...recipe, to follow!


...a funny sign by an owner or tenant of my complex...which wasn't as serious as they claimed!


Enhanced by Zemanta

Wednesday, September 12, 2012

#BundtaMonth-Banana Zucchini Bundt Cake

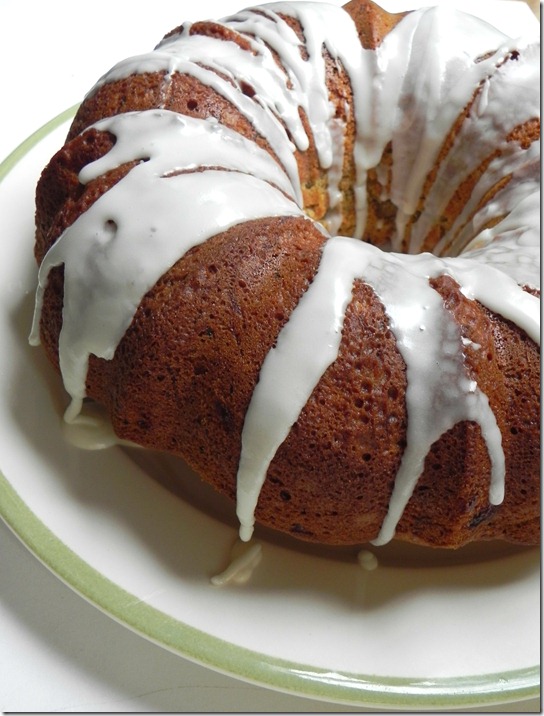
banana-zucchni-bundt-cake-1
I’ve loved baking Bundt cakes since my kids were little. Baking a Bundt is homey and comforting. There’s something about a round Bundt with the glaze drizzled down the side that is irresistible. Perfect for coffee or tea time with friends or to bring to a party.


It’s lovely that Lora (Cake Duchess)and Anuradha (Baker Street) collaborated to form a monthly baking group dedicated just to Beautiful Bundts: Bundt a Month!

What is #BundtaMonth all about?


Here’s the challenge:
 
Anuradha and Lora will pick an ingredient and announce it the first week of every month. All you Bundt loving bakers need to do is use your imagination on how you’d like to incorporate it and bake a Bundt – mini Bundt or large Bundt – and link it up to their blogs throughout the month. It's that simple! 
We decided to be creative with zucchini in our September Bundts.

Check out what our Bundt loving baking friends created for this month:


Anuradha from Baker Street baked Chocolate Zucchini Bundt Cake


Here's how to bake with #BundtaMonth:

- Bake your September #BundtaMonth Zucchini Bundt.
- Post it before September 30, 2012.
- Use the #BundtaMonth hashtag in your title. (For ex: title should read - #BundtaMonth: Chocolate Zucchini Bundt)
- Join the Bundt baking party! Share your link it to our blog hop by clicking here or here.
- Link back to both Anuradha’s and Lora’s announcement posts.


banana-zucchini-bundt-cake-3

banana-zucchini-bundt-cake-2

banana-zucchini-bundt-cake-4
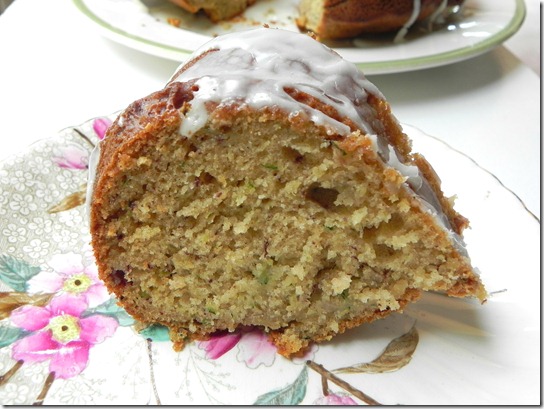
Mixing zucchini, banana and spices make a wonderful September Bundt cake.

DSCN9871

Banana Zucchini Bundt Cake

yield: one cake-serves 12 – 16
adapted from Martha Stewart and Dorie Greenspan

Ingredients:
3 cups all-purpose flour
2 tsp. baking powder
1 tsp. baking soda
1 tsp. cinnamon
¼ tsp. ground ginger
½ tsp. salt
2/3  cup canola oil
1 cup granulated sugar
2 whole eggs, room temperature
2 tsp. vanilla extract
1 cup sour cream
1 ½ cups mashed overripe banana (about 2 large bananas)
1 ½ cups grated zucchini, drained on towel (about 1 large zucchini)

Directions:
Preheat oven to 350 degrees. Butter and flour a Bundt pan, set aside.

In a medium bowl whisk together flour, soda, cinnamon, nutmeg, ginger, and salt. Set aside.

In a mixing bowl, mix together the oil and sugar until combined (about 2 minutes). Beat in the eggs one at a time until light and fluffy (about another 3 minutes). Beat in the vanilla and scrape down the sides of the bowl to incorporate all the ingredients.

With the mixer on low, mix in 1/3 of the flour mixture until fully incorporated and no streaks of flour remain. Stir in ½ cup of the sour cream and mix again until combined. Alternate with the remaining flour mixture and sour cream, ending with dry ingredients. Stir in bananas and zucchini until combined.
DSCN9872
Pour batter into prepared pan and bake in preheated oven for 50-60 minutes or until cake tester inserted into center comes out clean. *I check my cakes at 30 minutes and with this cake, I lowered the heat to 325 for the remaining baking time.

Lemon Glaze:
juice of 1 lemon
1 ½ cups powdered sugar

Juice lemon and whisk in the powdered sugar a little bit at a time until right consistency (I test it on my finger.If it doesn’t run down my finger, it’s ready). Remove cake from oven and allow to cool in pan on wire rack for 15 minutes before turning out onto rack and cooling completely. Drizzle glaze over cooled Bundt cake.

Have fun baking your Bundt!

...also linking to:Hearth and Soul Blog, @Zesty South Indian Kitchen


Enhanced by Zemanta

Sunday, September 9, 2012

Easy Chicken Salad Sandwich...and more

I have so much stuff to share with you...but first things, first. Yesterday, as I was commenting back on some of the comments (yes, I know I owe a lot more)...I came across a comment from Cathleen @ A Taste of...Madness
and as soon as I saw her yummy, and simple chicken salad sandwich, I immediately decided to use of the large roasted leftover chicken breast, from the whole roasted chicken, I made the other day.
For the recipe, just click on the link, but I also combined half of the portion for the mayo, with my homemade tartar sauce, or you can use a bottled purchase tartar sauce if you would like!
Roasted chicken is so versatile, but most of the time I purchase it ready made, fresh  rotisserie style, from my local supermarket. Just can't resist the aroma and the freshness of a roasted chicken.

The leftovers can be utilized so many different ways...if you haven't devoured all of it in one sitting, with family or company. In my case, I always have some leftovers which happen to be one of the large breast which I use for chicken sandwiches, but have not made chicken salad in a long time!


How could you not enjoy this delicious sandwich on your favorite sandwich bread or bun (I chose 100% whole wheat)

On the bottom slice of the bread, pile on the yummy chicken salad, and on the other
slice a generous chunk of your favorite lettuce, a slice of perfectly ripe tomato, and a thin slice of red onion (optional)...cut it half diagonally, and enjoy your sandwich with homemade ice tea...can't get better than that!


A 'sitting duck'...this isn't...but more like a 'squatting chicken'...which it is; 'hunch back', and all!...yikes! This image of a well roasted chicken, right out of the oven is NOT very attractive, but the chicken is perfectly roasted...except for the two bottom legs...which are squatted, and did not get golden brown, but it did get tender.

So why am I showing you this funny looking squatting chicken?...well, because of the cast iron roasting pan, and how clever and useful it is.


So, this is the famous cast iron skillet by Chef Emeril...I did not find this as a 'thrift find'...as a matter of fact, I ordered it online from HSN Home shopping...the cost was not cheap...close to $40. I must admit it really is an unusual, and different kind of roasting pan, but I am not crazy about it, and therefore,

I will want to get rid of it....probably donating it to Goodwill, or offering someone in the U.S. who will not mind paying for the shipping charge...that's all; just let me know if you're interested!


This was the original plan...roasted chicken, and baked sweet potatoes!

I'm gonna share my homemade tartar sauce recipe with you, to add to the chicken salad recipe!


So, I made my own delicious tartar sauce...which was not difficult, at all!


My homemade tartar sauce, which I featured in my previous post.


Here are the ingredients that I used...


OK...so here you have all the ingredients to process for the tartar sauce...sweet pickle slices, caper berries, and and scallions.Give it a whirl or two, and you can add this to your favorite mayonnaise.


So, that's all to making a simple homemade tartar sauce...here's my personal recipe concoction!

Tartar Sauce

! 1/2 cups really good mayonnaise
2 Tbsp. sweet diced pickles for the relish
1 Tbsp. caper berries
2 Tbsp. lemon juice
1 Tbsp. chopped onion
1 teaspoon brown mustard
about 1/2 teaspoon of pickle juice

Mix all ingredients together, and use it for side dish, or for sandwich spreads, and dips!

Sending you our beautiful rainbow from our South Florida early evening scene!


Enhanced by Zemanta