Showing posts with label Roasting. Show all posts

Thursday, April 12, 2018

Roasted Vegetables with Roasted Branzino

When you don't have much time to prepare a healthy and delicious dish for dinner, there's always fresh seafood available right here in S. Florida. Branzino is an Italian Sea Bass, very delicate and fairly small, but you have to make sure to have it properly filleted! Broiling, baking, poaching, and roasting is always a great option, just never...ever fry these babies or they will fall apart and the grease will absorb!

The Branzino is rather a little expensive, but it's so well worth it! The veggies only cost a mere couple dollars, purchasing them at our local produce market. $1.00 per each bag of tomatoes, onions, and the greens...which are baby dandelions, I think...never a label on the bag to let you know what it is😃

This is a perfect 30 minute meal, and guaranteed that your family will love it, that is if they like fish...this is the 'top of the line' fish!

Roasted Vegetables with Roasted Branzino
recipe by; Elisabeth

4 - 6 plum tomatoes sliced lengthwise into strips
1 med. onion sliced
2 - 3 garlic cloves sliced thin
1 bunch of greens, such as dandelions, escarole or kale
4 Tblsp extra virgin olive oil
1/2 cup of water
few leaves of fresh basil
salt and pepper to taste
3 pieces of Branzino (Sea Bass) filleted in half
and tail cut off

Preheat oven to 425 degrees F.
Just as in the photo, first line the bottom of a large broiling pan, or baking pan with a rim, with aluminum foil, dull side up. Drizzle 1 Tblsp of the oil on the foil, and line the pan in a row starting with the sliced tomatoes, sliced onions, sliced garlic, and the greens. Drizzle another Tblsp of the oil over the vegetables, and sprinkle the salt and pepper over them. Drizzle 1/4 of the water over the vegetables, and bake for the first 10 min without checking on it.

After the first 10 minutes check the vegetables, stir them gently and add the other 1/4 cup of water so they don't dry out! After the 20 minutes, gently push the vegetables to one side and line the fish pieces. Drizzle with the remaining 2 Tblsp of extra virgin olive oil, sprinkle the salt and pepper, and add the chiffonade slices of basil. Bake for exactly another 10 minutes, (not 1 min. over)
You can easily serve right out of the baking pan, over rice, or just plain, but don't forget to serve some nice crusty bread to mop of the pan juices...it's soo good!
Serves 4.

Linking to: Full Plate Thursday #375


Tuesday, May 24, 2011

Roasted Peppers, the Easy Way!

If I show you step-by-step how easy is to make the best roasted peppers in your own oven, I guarantee that you won't buy the jarred kind, which does not come remotely close to the homemade kind. I'm not going to convince you that it's cheap to buy red, yellow, or orange bell peppers, but if you can find a local produce market, chances are they always have bulk buys of whatever kind of vegetables that they have an abundance of, or they are getting a little too ripe, so they will put it on sale. Our local Cuban produce market has the freshest and such a variety of every kind of produce you can find.

I'm linking this to Full Plate 5-26-11 @ Miz Helen's Country Cottage

 also...HURRY,
You don't want to miss out on this giveaway on Lora's blog @ Cake Duchess Honey Girl Organic Skincare products, from Hawaii. Be sure to check it out!

You can visit their website to learn more about their amazing products! There is even a video here on this page that shows how they get the honey from their own bees in Hawaii.

honey%20girl%20organics_2007_ed


I was so thrilled when my daughter gave me 2 large bags of peppers, and zucchini, that she bought for $1.00 each bag from the produce market. That's what I call a real thrift buy and I am truly grateful for it.
If you love peppers as much as I do, follow me through all the steps and I will show you how easy it is to make roasted peppers.

This is where the easy part comes in. Cut the peppers in half, and clean the seeds out. Also, discard the core.
Depending how many peppers you have, Line one or two bake pans with aluminum foil.

Place the peppers facing down, and spray with cooking spray. You can also scatter some garlic cloves around them. Do not drizzle with oil, or it will get too wet. Peppers will release a lot of liquid during roasting time. You don't have to season peppers at this stage.


I would have preferred also some red and yellow, although there was one red pepper in the bunch. What can I say? This bunch cost $1.00. I am happy with this "loot." Set your oven at 425 degree F. Roast peppers for about 45 minutes, do not turn them...it's not necessary.
When they appear wilted, and wrinkled like in the photo, you can remove from the oven.


Have a large plastic baggie ready. With a tong, remove peppers to place into the bag and snap it closed.


Put all the peppers in the bag, and let it sit in the bag for about 20 minutes...by that time they will also cool down and it will be easier to peel the skin off.


Empty the peppers into a colander and place into a clean and empty sink.


Just look, how easy the skin comes off. Pile the peppers on a platter, and ready to prepare them.


These are the peeled peppers, ready to be sliced.


On a cutting board, with a small sharp knife, slice all the peppers, and line a platter decoratively.


Line a platter with the peppers, and in between the layers, drizzle a very nice extra virgin olive oil, and white balsamic vinegar.


This is the amazing White Balsamic Vinegar I used to drizzle on the peppers. Notice that it's fig infused which gave a slight sweetness. Just sprinkle with sea salt, a small amount of garlic powder, and freshly ground pepper, and you can also add a nice touch of sliced sun dried tomatoes in olive oil.

note: you can also add the roasted garlic pieces to the layered peppers. The reason I added garlic powder, because fresh garlic overpowers the sweet natural flavor of the peppers.


I like to make my own sun dried tomatoes, which I do quite often and keep in a jar, but I did find this beautiful California Sun Dried Julienne Cut tomatoes which I truly love to add to my recipes.


Just look at the beautiful vibrant colors...the sun dried tomatoes, and the roasted peppers. You can add them to sandwich, use as appetizer with crunchy pieces of bread, add them to pasta, or salad, and you can also add them to cooked vegetables...Enjoy!
Enhanced by Zemanta

Tuesday, March 1, 2011

Hungarian Lecsó (lecho)


The other day, I found a "treasure" in my local supermarket, Publix, which I'm proud to announce. A gorgeous bag of local sweet mini peppers, in assorted colors. When I opened the bag, the fresh, and sweet aroma just permeated throughout my little kitchen. I have been waiting for these amazing little sweet, and crunchy, colorful peppers, that when I picked up the bag from the special stand, a little old lady asked me..."are they real?...I didn't want to be mean,  and say..."no, they're plastic"...she really meant well, and I wasn't about to make a "snarky remark!"
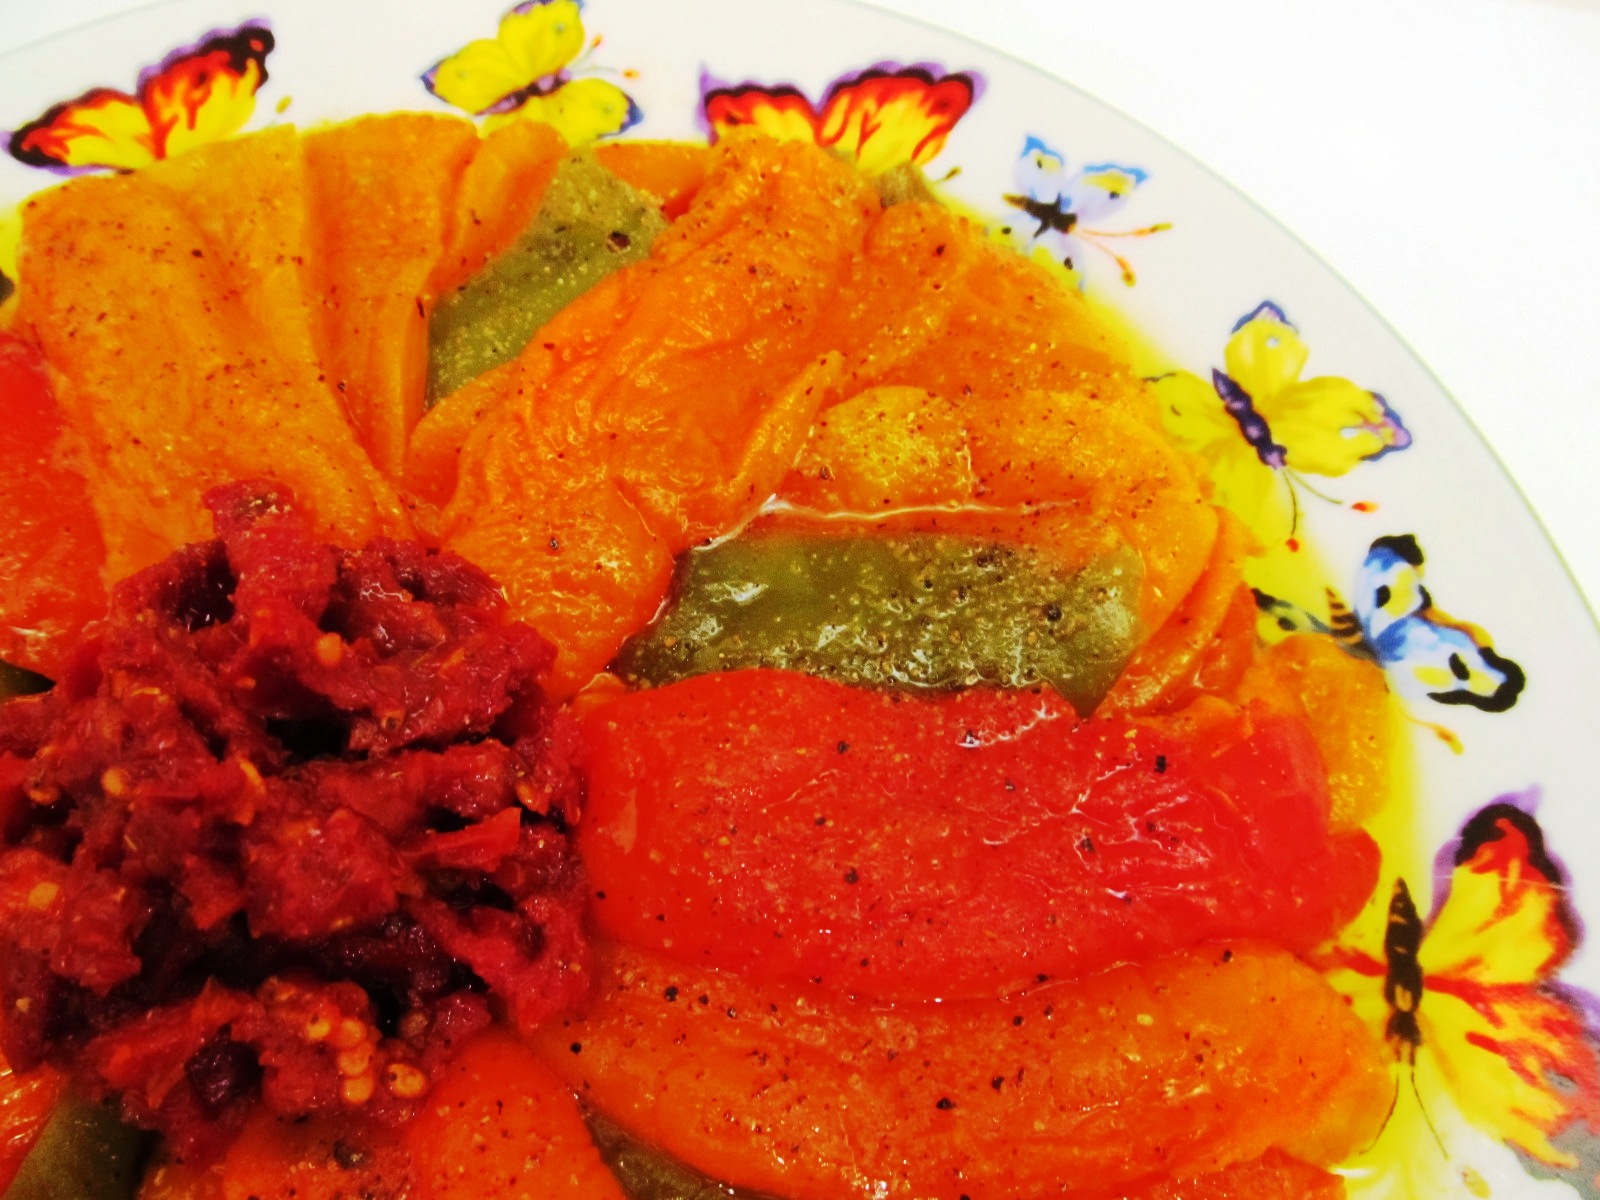
Such a huge bag of these gorgeous peppers can be made different ways. My second choice: Roasted peppers...and why not? They are ever so delicious, and with these tiny peppers, you almost don't even have to remove the skins, after roasting them. Just drizzle vegetable oil on the peppers on a aluminum foil lined bake pan, and add pieces of garlic, or chopped garlic, salt and pepper, and fresh rosemary, and bake at 425 degrees for about 45 minutes. Leave the little peppers whole, when you roast them. It's even more delicious when you open them after they're done. It is not hot, or spicy, just sweet, and pleasant yummy flavor.
I still had the second portion of the bag of new red potatoes, so I pre-boiled them, first, cutting them in half, and boil them till almost done, and sauteed them in extra virgin olive oil, and butter, and added fresh chopped parsley, freshly grated sea salt, and fresh ground black pepper, and made an amazing vegetarian meal out of the lecso, potatoes, and nice crusty bread, to dip into the rich tomato/paprika sauce. "Out of this World"...amazing, and healthy dish!

Hungarian Lecsó (lecho)
my own recipe

About 2 lbs. of sweet assorted, or hot peppers
1 large onion sliced, or chopped
3 cloves garlic chopped
1 large can of a 28 oz. diced tomatoes
or you can use about 4 fresh chopped tomatoes
4 Tablespoon vegetable oil
salt and pepper to taste
2 Tablespoon sweet Hungarian paprika
1/2 cup of water

In a large skillet, saute onion and garlic over medium high heat, till onion gets a golden color. Pull skillet away from the heat, and add the salt, pepper, and paprika. Stir, to combine, add the water, and add the mini peppers, cut into half, removing the seeds, or with the larger peppers, cut into strips, and also removing the seeds. Stir to incorporate, and saute for a few minutes, then add the tomatoes, and cook slow, over medium heat until peppers get slightly softened, and tomatoes get to a thick consistency. Serve them as a side dish, or appetizer, or save some to add to scrambled eggs, which is a super delicious breakfast treat. Serves 4-6

This is the bag of the sweet peppers.They are from a local Florida produce farm. They are so incredible, and delicious. So full of natural vitamin C.


I mentioned in my last post about going to the Greek Festival, which this year is the 36th event. It happens to be just down the street from my son's house. A beautiful Greek Orthodox church is hosting the event, and it's ope to the public. Admission is only $3.00. and even if you do not go with your family, or friends, you can hang out by yourself, and enjoy the live entertainment, and the best, of the best Greek food, that is lovingly made by the members of the church. Here's my family, walking to the event. Just minutes away, streets are totally lined with cars, and needed police escorts to make sure that everything is running smooth. The place was set up with a huge tent outside, and the smell of the outside grilling was incredible. Beautiful sunshiny day, on a Saturday afternoon, with gentle breezes coming from the Intracoastal water.
The first thing we saw when we walked in was the dancers, in their folk Greek authentic costumes. These young people did such a wonderful job...so entertaining!


No Greek festival can be without Baklava...and I'll tell you, these were the best I've ever tasted. They were $2.50 for a tiny triangle piece, but worth every bite of it, which I literally shared with 2 other members of my family, just one bite...oh, so incredibly rich!

It would not be a Greek festival without the Moussaka, a Greek style Shepherd's pie...ground lamb, layered with potato slices, and baked eggplant slices, topped with a rich Bechamel sauce, spiced with nutmeg, and cinnamon. So good, and comforting...and very filling!

 As we walked outside the Pavilion, I looked up in the sky, and saw the "happy sky writer" in action, again. sending the "good news" our way. Wonder if anybody pays him for sharing the message of Jesus!...at any rate, such a nice gesture on a clear, and sunny S. Florida day!
...and here's my family, sharing this lovely "smorgesbord"...a variety of "happy meals"...no, not McDonalds, but great Greek food, and next to my little grandson is my chair, and my favorite Greek salad...and oh, a nice ice cold Greek beer. No one else was drinking beer...just me, the "happy Nonna-Grandma"
Inside the Pavilion tent was this amazing Greek band, that played such good music, that brought people to their feet to dance.


Just look at all the fun stuff to buy, that is traditional Greek fun things for festivals, such as this.
Look at all these people underneath the Pavilion tent. It must take the church all year to plan this successful event, for a whole weekend, every year of the last week in February, and each year the weather somehow turns out perfect.


Enhanced by Zemanta

Thursday, February 24, 2011

Grilled-Boneless Center Pork Loin Chops

Being in the culinary industry for over 30 years...there are two important cooking equipments I learned to rely on, and the first one, is a large cast iron skillet, and/or a heavy duty stainless steel skillet, and a cast iron grill pan. or a Calphalon grill pan. Those are my "lifesaving" most important equipments, which is a "must have."  Also, there are two other important ingredients which is a "must have" is a high quality Dijon mustard and/or a high quality Stone Ground Mustard. Also, I rely on a special jam, or "preserve" which I use for glazes on my grilled meat, and also for glazing my fresh berries, melting it down, and this is my most favorite, which is sometimes hard to find. "Pure Seedless Boysenberry Preserves"...now that I gave away my "must have" secrets, I would like to share my super easy recipe for my Grilled-Boneless Center Cut Pork Loin Chops, along with My Roasted Red Potatoes, and Caramelized Onions to pair with it....and of course my most favorite sweet and spicy glaze. Here's and interesting link Boneless Center Pork Loin Chops that will help you with the grilling these lovely super moist and tender pork chops, which is called "the other white meat"...so true...yes, indeed!

These lovely small red potatoes are so tasty, and stays firm when roasting them at a high 425 degrees temperature for about 45 minutes along with sliced sweet onions, and sprinkled with fresh rosemary. All you need is a good quality sea salt, and freshly ground pepper for the spices. Just make sure you add them first to a large bowl, and turn them with enough vegetable oil...not olive oil, because olive oil tends to burn. add them to a cast iron skillet, or aluminum lined baking dish, and that is all. You're ready to roast them and it makes a beautiful side dish, with any meats, or other vegetables, including a salad which I used! Yumm!...now how could you possibly resist this roasted goodness?
Here's the finish result...just a simple mixed salad, with your choice of toppings. I happened to have grape tomatoes, pitted Nicoise olive, and Feta cheese on hand...these are always my most beloved staples. Just a splash of extra virgin olive oil, and white balsamic vinegar, mixed with a teaspoon of Stone Ground Mustard, for the dressing!


Grilled-Boneless Center Pork Loin Chops
my own recipe

Marinade
2 to 4 pieces Boneless Center Pork Loin Chops
2 Tablespoon Dijon Mustard
1 Tablespoon White Balsamic Vinegar
Salt and pepper to taste
1 Tablespoon of vegetable oil
2 sprigs of fresh rosemary, stripped
(one for the potato, and one for the pork)

First step is to marinade the pork chops in the marinade, by combining the ingredients and spreading it on the chops, on a large plate, or platter. Cover, and leave it out on the counter, for no longer than 30 minutes, while you are heating up your indoor grill pan, or electric grill pan, or an outdoor grill. You could marinate it longer in the fridge, for up to 2 hours, but not necessary.
Place chops on the heated grill that has been seasoned with oil, or cooking spray, make sure you put the exhaust fan on. Grill for about 3 minutes, turn it a slightly to the right to get the "criss-cross" effect, and grill another 2 to 3 minutes. Flip over to the other side, and cover the grill pan with a large lid, lower the temperature on the stove, and proceed grilling the same amount of time. Total time should not be more than 10 minutes, or the meat will be tough.
This is not the kind of pork you should cook for a long time, or it will get tough. It is pure white meat, and NO fat!

For the glaze:
2 Tablespoon Stone Ground Mustard
2 Tablespoon seedless Boysenberry Preserves
(you can also use seedless raspberry or other seedless berry preserves)
1 Tablespoon dark Balsamic Vinegar
1 teaspoon Vegetable Oil

Mix all the ingredients in a small saucepan and bring it to a boil. Lower temperature, and cook until it reduces somewhat to a syrup. You can double the ingredients if you would like more glaze. Just drizzle around the plate at serving time, and drizzle some on top of the meat. Very festive, and delicious! Serves, 2 to 4.

One last note of Thanks to Sharon @Shosh's Yummy Foods for hosting this truly amazing giveaway with Progresso, and their fabulous Panko, which I already have been using, and love it...and the most Gorgeous Cookbook, ever, from Michael Chiarello. I love this chef, and all...seriously all his recipes. I don't mean to "toot my own horn" but this is my style of cooking which I have been doing all these years...that's my specialty, the homemade pastas, the grilling, the meats, sea foods, and vegetables and the simple, but elegant desserts. On the final note on his book. He has the most amazing black and white photographs, but as for the color photos, the lighting seems to be off, and most of the photos were taken inside, where they did not focus on the lighting, and they tend to have a darker image, not bringing out the true vibrant color of his famous dishes. The action photos are really superb, for that matter.

I have learned to pay more attention to the photos, every since we've been so involved with the Foodbuzz Community, and you can take some serious Tips, from Chef Dennis, @More Than A Mount Full, and just take a look at Gina's blog @ What's For Dinner Across State Lines who also took serious time to make her lighting better. You don't necessary have to run outside when the temperatures in your area have been in the teens, cloudy, or rainy...even here, in S. Florida I can't always capture the sunlight, but I do have a better new camera now, and focus on better lighting, and most important. "The Plating of my Food"...so that is my little trick and  secret, plus, honest reviews from Family members. They will surely tell you their honest opinions, so just listen, and learn!


Enhanced by Zemanta