Showing posts with label Bread. Show all posts

Wednesday, October 10, 2012

Red Clam Sauce with Linguine

I'm at the point where I feel like 'throwing in the towel'...and take a 'blogging break'...I'm totally discombobulated, disconnected, so not on the 'ball' with my blogging, and keeping up with my posts that would actually amount to something or feel I have a connection to the proper groups, blog hops, social networks. I'm probably the only food blogger that hasn't used STUMBLE! Even my Google+ is sitting there all lonely and not properly attended to. I was one of the last ones that stayed on the old Blogger format, until they finally discontinued the old format! Good thing I'm able to figure out the new Blogger format, which is really great:)

As I mentioned the last time that I don't take photos of the things I make every day...but then, if I don't have a plan for something special, than I have no other choice but sprucing up my dish to take some photos, mostly in my kitchen, for the best light at night... if I want to have a new post.

This is a classic Italian Clam Sauce with Linguine, but one rule is that, it's either 'White Clam Sauce'...not a white cream sauce, but a simple extra virgin olive oil, garlic, and lots of fresh parsley; and don't forget the lemon. In case of the 'Red Clam Sauce'...not drowning the clams in a heavy red sauce, but the same format, leaving out the lemon juice and lemon slices, and using white wine. As for the tomato sauce, it really is just Hunt's diced tomatoes in their natural juices, or you can you fresh diced tomatoes, just don't overcook them so they keep their diced shape.

My recipe is from 'scratch'...from memory of a 70's classic that I still remember, only adding the diced tomatoes to it! The best way to make this even special, is to add fresh steamed whole baby clams, to add more flavor, and for presentation.

Red Clam Sauce with Linguine
recipe by; Elisabeth

2- 7 oz. cans of chopped clams
1/2 cup extra virgin olive oil
3 or 4 cloves garlic chopped
a handful of Italian fresh parley chopped
1-15 oz. can diced tomatoes (I used Hunt's with sweet onions)
1/2 cup white wine (real wine, not cooking wine)
1 teaspoon chili pepper flakes
freshly ground pepper to taste
salt (use sparingly, clams are salty enough)
1 dozen, fresh baby clams (I used 10 for two serv.)
1 lb. linguine, or spaghetti


In a medium saucepan, add the 1/2 cup extra virgin olive oil (don't worry about the amount, you need a lot of oil to soak up the clams and pasta)

On medium high heat, add the oil, the chopped garlic, the red pepper flakes, and heat up till the garlic sizzles, just don't let it get brown. Add the half cup wine, a good portion of chopped parsley, and the juices from the canned clams. Do not add the clams at this time.

Add the canned tomatoes with the liquid, and heat to a slow boil. Simmer for about 10 minutes, and at the very end, add the canned clams. Just gently stir, and simmer on low for a about another 5 minutes. Keep it on warm, while you're boiling the water for the linguine. For the fresh clams, In a skillet, add a small amount of chili red pepper and more garlic if you like, add another 1/2 cup of white, a small portion of parsley, Cover with a lid, and boil until all the clams open up, which should take no longer than a few minutes.

Important to note: Do not try to pry open any clams that do not open up by themselves. In my case, 2 clams did not open up...so I had to discard it. (discard any that do not open up)

To serve: In a serving bowl, add the linguine, and ladle the sauce with the clams, and mix gently together. Garnish with additional parsley, and carefully surround the bowl with the opened fresh clams. (As a rule, do not add grated Parmesan cheese) Serves 4.

Linking to: Thursday Favorite Things Blog Hop, @ Katherines Corner
Enhanced by Zemanta

Saturday, October 6, 2012

Pumpkin-Banana-Cranberry Mini Bundt Cakes #BundtaMonth

Notice something different?...I figured out how to use 'text' in my photos! So thrilled to start out for the #BundtaMonth Challenge, and the theme for October is Pumpkin!

Vintage 'Vera' table cloth, (brand new $1.99) ...a 'thrift find' from Goodwill
Hi everyone! I have so much to share with you starting with this post...which is so exciting because, it is the month of October, a very favorite month of mine which spells FALL, AUTUMN...HALLOWEEN, the crisp cool fall weather...of course; I'm not talking about S. Florida, but in our northern states, and everywhere else where they celebrate the beautiful fall season. I mentioned before that this is one of my all-time favorite season with the beautiful changing of the gorgeous autumn colors of the leaves...weaving its magical bright orange, yellow, brown, burgundy colors. So mesmerizing and enchanting, that I would want to enjoy this for more than just a short time!

I've been wanting to link up with such great 'blog hops' ...but for me, the easiest ones are the ones where I can link up whatever I have on my blog for that chosen day...but as for the #BundtaMonth link, I cannot resist it not just because my daughter Lora and Anuradha are the partners in crime of this fabulous 'bundt' challenge...and I just happen to love bundt cakes. I have been baking bundt cakes since the seventies when they were so ultra-popular.

I still have my original dark orange color seventies bundt pan along with a couple newer ones, and an awesome mini heavy duty pan, a 'thrift find'...which I love to bake in. I didn't want to take time browsing for a recipe, so I just used my 'trusted' basic banana bread recipe that I have memorized, modified it, and added the pumpkin and the fresh/frozen cranberries from Whole Foods.

What is #BundtaMonth all about?

Here’s the challenge:
Anuradha (Baker's Street) and Lora (Cake Duchess) will pick an ingredient and announce it the first week of every month. All you Bundt loving bakers need to do is use your imagination on how you’d like to incorporate it and bake a Bundt – mini Bundt or large Bundt – and link it up to our blogs throughout the month. It's that simple!

They decided to bake with pumpkin in their October Bundts.

If you're out of ideas and are looking for inspiration you should check out their Pinterest board that has 100+ bundt cake recipes.

Pumpkin-Banana-Cranberry Mini Bundt Cakes
recipe by; Elisabeth

1 cup all-purpose flour
 (I used King Arthur unbleached all-purp)
1 cup whole wheat flour
1 teaspoon baking powder
1 teaspoon baking soda
1 can (15 oz) pumpkin (I used Libby's
2 ripe bananas
2 large eggs
1/4 cup vegetable, or canola oil
1 bag (12 oz) fresh, or frozen cranberries
(you can use dried cranberries, in place of fresh
or frozen...1 cup)
1 teaspoon salt
1/2 cup granulated sugar
1/2 cup light brown sugar
1 teaspoon vanilla extract
1 teaspoon cinnamon
1/4 teaspoon nutmeg (I used a sm. amt. of fresh grated)
3 or 4 pieces crystallized ginger
(you can use 1/2 teaspoon powdered ginger instead)


Preheat oven to 375 degrees F. Get 3 bowls ready for your ingredients. (1 large, 1 medium, and 1 small)
On the top right photo...in the large bowl,
add the canned 15 oz. pumpkin puree, the 2 sugars,
the cinnamon, the grated nutmeg, the 2 bananas, and mash coarsely with a potato masher.

In a small bowl, add the 2 eggs, and 1/4 cup vegetable, or canola oil, and whisk with a fork.


In the medium bowl, combine the flours, salt, baking powder, and baking soda. Mix together.


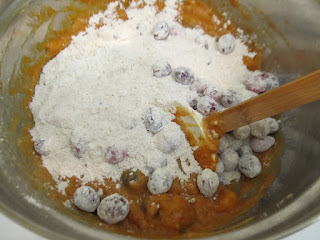
Add the cranberries, and the crystallized ginger to the flours and mix gently together. The importance of this method is; so that they don't sink to the bottom of the batter when baking.


Now, you can add half of the fruit and flour mixture to the pumpkin mixture, in the large bowl. Also the the egg mixture to that, and fold in gently.
Now, finish adding the second half of the fruit and flour mixture, and fold that into the large bowl, again.

Finish, by gently incorporating everything, so that you don't smash the cranberries.


Spray a a mini bundt pan, and a 6 cup muffin pan with cooking spray, and add the batter carefully, about 3/4 full  in the bundt pan, and halfway full in the muffin pan

 Bake at 375 degrees for 20 minutes...remove the muffin pan, which will be done...Lower temperature to 350 degrees F. and finish baking the mini bundts for another 20 to 25 minutes (total 45 minutes for the bundt cake) Cool on metal rack for about 15 minutes before inverting the bundt cakes.


As you can see, I've worked very hard on this challenge, planning, working on re-constructing the actual 'memorized' banana bread recipe from 'scratch' taking step-by-step photos...trying to capture a good natural light with a 'speck of sun'...virtually, never using 'props'...just 'thrift finds' items I have on hand.

I almost forgot the glaze recipe!

2 cups powdered sugar
1 teaspoon light rum
1 teaspoon (maybe 2, if needed)


Mix all the ingredients with a fork, making sure there are no lumps, and to have it at a fairly thick consistency. (finger testing)...making sure it stick to your finger when you test it. Drizzle on with a teaspoon, since these are small cakes.

Just look and see how incredibly moist is the texture. Your taste buds are in for a huge surprise when you bit into the sour taste of the cranberries, and the sweet tangy taste of the crystallized ginger.

As for kids under 6...I recommend using dry cranberries, that have been soaked in boiling water for a few minutes before mixing it in the batter. (my little 6yr. granddaughter literally picked out each cranberries before she ate the cake, which she did like, but not approved of the sour taste, which actually mingles with the sweet cake and a surprise of the slightly spicy crystallized ginger!
Enhanced by Zemanta

Tuesday, September 18, 2012

My 'Award' Winning Pizza for #Twelve Loaves September

Does it seem like I'm the only 'oddball?'...seriously! I do everything differently than the other fellow food bloggers. I'm so 'lame' when it comes to joining a group, or even linking up something. Not consistent, and certainly always falling behind schedule. I did try to link up last week with my Cheddar Cheese bread for Lora's #Twelve Loaves September, which required a cheesy bread, but did not know that pizza applies...and I did make my own dough this time with the most amazing yeast from RED STAR, called PLATINUM!

linking to:#Twelve Loaves September @ Cake Duchess
              Hearth and Soul Blog Hop @ Zesty South Indian Kitchen
              Full Plate Thursday @ Miz Helen's Country Cottage
              Thursday Favorite Things Blog Hop @ Katherines Corner


...again, I chose to be alone...needed some quiet time to 'reflect'. Not exactly a holiday dinner; since it was Rosh Hashana Eve! My daughter had a beautiful celebration at her house with their best friends and family, and I was just not in the mood for more work in the kitchen, so I did not join!


I'm so unlucky with yeast, even though it has the proper dates for the expiration...somehow I tend to mess it up. The last time I know it was too hot water, that I added the yeast to dissolve. This time I made sure that the water was slightly warm, and it worked! (sorry, no photos of my step-by-step direction, was not going to use this post)

I am so overly critical of getting a good crust for my pizza, that I'm so picky when it's home made. For me, it has to have a good rim, and it has to be baked just right...actually, pre-baked which I strongly prefer, in order to get a good crunchy crust, not to have it soggy, or greasy, and WORST, underdone!

I have a few really good pizza dough recipes, including a whole wheat dough which is softer, than the regular unbleached white flour pizza dough. We prefer the traditional dough, and this recipes is so easy...so basic, saved from 1998 Gourmet magazine, which I am happy to share with you!

Basic Pizza Dough

For a 12-inch pizza

1 packet of Red Star Platinum dry yeast,
or your favorite (abt. 1-1/2 teaspoon)
2/3 cup warm water
2 cups unbleached all-purpose flour
(I used King Arthur)
1 teaspoon salt
olive oil for the bowl

Sprinkle the yeast over the water. Let stand 1 minute, or until yeast is creamy. Stir until the yeas dissolves.

In a large bowl, combine the 2 cups of flour, and the salt.
Add the yeast mixture and stir until a soft dough forms. Turn the dough out onto a lightly floured surface and knead, adding more flour if necessary, until smooth and elastic, about 10 minutes.

(you can skip all this process, by adding all the ingredients in a bread machine, on DOUGH setting, and let the machine do the work for you)

Lightly coat a large bowl with oil. Place the dough in the bowl, turning it to oil the top. Cover with plastic wrap. Place in a warm, draft-free place and let rise until doubled in bulk, about 1-1/2 hours.

Punch down on dough, and flatten with your fist. Spray your pizza pan with a non-stick cooking spray. If dough is sticky, you can add a little more flour, just do not knead any longer. Cover the dough with a dish towel and let it soften, to expand for an additional 30 to 45 minutes. At this time, you can stretch the dough all the way to the rim of the pizza pan. Lightly spread olive oil on the dough, and pre- bake for about 10 minutes, in a 425 degree F. oven on a pizza stone (preferably) to assure a good crusty dough.

At this time, you can leave the dough to cool down, and use for later, or proceed with your favorite topping for the pizza, to bake for an additional 10-15 minutes for the sauce, to set and the mozzarella cheese melt and slightly brown.
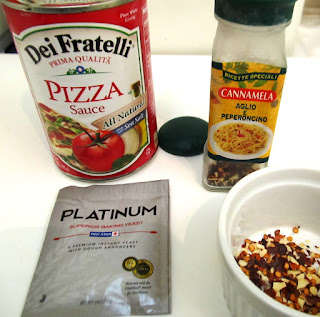
I strongly recommend a good quality pizza sauce, such as Dei Fratelli which is a superb quality. Just be sure to add to a small bowl, and stir about 1 to 2 Tbsp. olive oil and your favorite spices. (I used an Italian brand, a gift from Italy by Lora)

For a fresh mushroom, sliced red onion, and pepperoni topping:

Saute about a handful of fresh sliced mushrooms along with sliced red, or regular onions, just slightly...set aside.
In the meantime, spread the pizza sauce, thin, or thick on the pizza, not quite to the outer rim. Sprinkle with shredded mozzarella, divide the mushroom mixture, and bake for 10 minutes. For the addition of the pepperoni slices...make sure to add the pepperoni slices at the last 5 minutes, (otherwise they will shrivel up and dry out!)
Leftover pieces of pizza can be reheated, or eaten cold (which I love)...the next day...Enjoy!

So there, you have a perfect 'Award' winning pizza, made with love, and Red Star PLATINUM yeast!
BTW- I still have to post my awesome Fresh Tomato Tart recipe, for the next post...just remind me, if I forget. xo

Join Lora, Barbara and Jamie with the #TwelveLoaves baking project!

 The month of September is about bread and CHEESE! Who doesn't love bread and cheese? You could make a quick bread or yeasted bread (muffins, scones-PIZZA)and link up to the girls. I attached Lora's link for you to see the pretty pull-apart bread she baked.
Enhanced by Zemanta

Wednesday, September 5, 2012

Palacsinta {crepes}...and a big 'flop'

Hungarian palacsinta, {crepes} filled with homemade mango jam
At the rate that I'm going...looks like I could go from 'Silent Sunday'...right into 'Silent Wednesday'. Actually, I was hoping to post a cheddar cheese bread for Lora's '#Twelve Loaves'...for the month of September, but my bread just did not rise...it refused to rise...waiting for over 2hrs (recipe called for 2hrs of rising)...waited for 3hrs, and still not much luck, but I persevered and was determined to shape the bread, and make it any way!

linking to: Hearth and Soul Blog Hop @ Zesty South Indian Kitchen


For Labor Day, which I hope you all had an enjoyable time with family and friends...as for me, I opted to stay home-alone, which did not happen.

I was so thrilled the my son came by with my two sweet granddaughters but then...I did not have a plan for lunch, but certainly had the right ingredients for a quick mac n' cheese (from scratch)...little burger sliders, on my grill pan, and for dessert, palacsintas filled with my mango jam.  Not so bad after all...and for the latter part of the day, I went by my daughter's neighbors' for a BBQ. Great day, after all!


Please excuse the not so great presentation of my photo but really good crepes)... and the scribbled recipe...I really wasn't going to bother posting this (I had my heart set on posting my bread, which unfortunately flopped...sigh!)

I hope you can make the chicken scribble out, I saved this recipe for the past 20 years now, tucked away in my little red box along with my other index cards, and hand written recipes. Recipe makes at least 12 crepes (pancakes is not the right term) copied it from 'word to word'...from a Hungarian cookbook written in English.


Here's the most amazing grill pan I found at Goodwill last weekend...brand new, heavy, I mean super heavy weight cast iron grill plan from IKEA for $9.99. I just had to have it, could not pass up this great grill pan. I tried it out to make my little mini burgers...of course, the pan has to be sprayed first with the vegetable cooking spray, and pre-heated, but just look at those grill marks on the burgers...a great 'thrift find' for sure!


Another amazing 'thrift find'...this awesome mini cake pan with 4 compartments to make the same banana bread recipe that you would make in one loaf pan. The time that it takes to bake, is totally half the time then the one pan makes. This was done in 35 minutes, moist delicious and yummy. Cost for the cake pan, $4.99.


I hope I'm not going to regret this...but I feel that after all the work I put into make this bread, which I will try again...not understanding what happened with the yeast. 1.) I should have waited to see if the yeast dissolves in the warm water properly before adding it into the work bowl with the other ingredients...2.) I used warm tap water...maybe too warm, and it killed the yeast from bubbling up, because it certainly did not look like it bubbled, just merely dissolved...I am determined to re-make this, or something with some kind of different cheese for a different yeasted bread or rolls.

I was all set to start out with fresh herbs that I planted at Lora's garden. Oregano and basil, they are always striving, and so healthy...especially the oregano, which is so healthy looking, and so aromatic.


Kneaded the dough properly...so far, so good!


The dough looks great...thinking that I'm still on the right track.

After 2 hrs, which recipe called for to rise double...well, it did not. Dough was tough...nothing to punch down on; which you're supposed to do. I was still determined to keep going.


I even fried up some bacon, crumbled it, and added into the dough, and worked it in.


I shaped the loaf, and placed it into the loaf pan...


Well, here it is, grated cheddar cheese sprinkled on the top, and baked for 35 minutes. Did not rise high.


I am soooo embarrassed to show the result...the taste was so incredible with the bacon bits, there's grated cheddar cheese right in the batter, and fresh snipped herbs. Lora asked me if I'm going to post this flopped version of my bread...and I said, NO, of course not, but then, I had a change of 'heart' and are revealing my 'failure'. As you can see the texture is hard, and not light and flaky...this texture is what you would call it in Hungarian...'szalonnnás' meaning...like the tough pork fat!

Not 'throwing in the towel'...just throwing out the bread...so sad, but will try again!
Enhanced by Zemanta

Wednesday, August 1, 2012

Blueberry-Peach Bread...for "Twelve Loaves"

I decided to make some fruit filled bread, since we are in the midst of the summer season, with plenty of summer fruits available and at such cheap price. Blueberry happens to be one of my all-time favorite berries, and to combine it with juicy ripe peaches, is the first time for me...although I have seen it on other food
bloggers site.


If you love banana bread, or any fruit bread...you cannot help, but fall in love with this amazing peach-blueberry combination! The recipe is really just based on my banana bread recipe, that I know by 'heart'...just a few adjustments, and substitutions...here-and-there.

You're probably wondering what is the 'Twelve Loaves' about in the title?...well, it's a baking challenge created by my daughter Lora. I'm happy to join along as a hostess this month. I am happy to contribute, which I am doing now, this 1st homemade bread as the "blueberry challenge"...as long as un-yeasted breads are accepted...which is this one is, I'm fine with it!

Just look at the golden color of this beautiful fruit bread, and you can see the moistness, as well. The glaze is a Limoncello glaze...a special bottle that was a gift for me from Italy. In the meantime...I still have a couple of mango recipes that I would like to post. I already made one of the best mango sorbets that  was gone in minutes, as soon as it set. That will be my next post. No step-by-step prep photos on this one either, you can  follow the recipe...its self-explanatory.

So, my baking friends...please join us baking this month!Look how easy it us to link your Bread with Summer Fruit!


Bread with Summer Fruit
Bake a bread, yeast or quick bread, loaf or individual, filled, stuffed, studded or topped with your favorite fresh summer fruit or berries. It’s your bread…we want you to have fun with the idea!Check out the delicious breads that Lisa from Parsley, Sage and Line Drives baked and Jamie from Life's a Feast. Just wonderful!

Just follow the rules, it’s as easy as pie:

1. When you post your Twelve Loaves bread on your blog, make sure that you mention the Twelve Loaves challenge in your post and mention and link back to Lora's blog. Please make sure that your Bread is inspired by the theme! This is obligatory if you would like your link to be included!
2. Please link your post to the linky tool at the bottom of my blog or Lora's,   blog. It must be a bread baked to the Twelve Loaves theme.
3. Have your Twelve Loaves bread that you baked this August, 2012 posted on your blog by August 31, 2012.

Do you tweet? We sure do!

Follow @TwelveLoaves on Twitter


Blueberry-Peach Bread
created by; Elisabeth

1 1/2 cups unbleached  all purpose flour
1 teaspoon baking powder
1 teaspoon baking soda
1/2 teaspoon salt
3/4 cup sugar
1/4 cup vegetable, or canola oil
2 eggs
1 cup fresh, or frozen blueberries
1 cup pitted, and diced peaches
1 cup peach pulp

For the Glaze:
1 cup powdered sugar
1 Tblsp Limoncello, or lemon juice

First thing; have your pitted, and diced peaches ready in a small bowl...set aside. In a large bowl, add the flour, the baking powder, baking soda, and salt. Mix together with a fork. In a medium bowl, break the eggs, and lightly mix together with the oil, and sugar. You can add the peach pulp, by adding about 3 or 4 pitted peaches to your blender, add abt. 1 Tblsp water to blend. (if you don't want to use this process with the peach pulp, you can skip it) you can use 1/2 cup orange juice, in place of the pulp.

With a plastic spatula, or spoon, add the wet ingredients to the flour mixtures. Add the pulp, or the orange juice, slowly and fold in. Lastly, add the fruit, folding in carefully, not to break it up.

Preheat oven at 350 degrees F....bake for 25 minutes. Lower the temperature to 325 degrees F. and bake for an additional 35 minutes longer, or until toothpick inserted comes out clean. Cool on rack for at least 30 minutes. Mix the glaze ingredients, and drizzle over the top. Cut in slices...so very good!

Linking to: Full Plate Thursday @ Miz Helen's Country Cottage
Thursday Favorite Things @Katherines Corner


Enhanced by Zemanta

Saturday, July 28, 2012

Zucchini Quiche...made easy!

A new and fresh  BISCUIT MIX...so versatile, that you can make your own homemade BISQUICK. If you live in the U.S. you must be familiar with the famous Bisquick biscuit mix that you can make pancakes, coffee cakes, biscuits, pies, and quiches with? Well there's a solution to making your own mix, without the preservatives, and you can keep the mix in you fridge for weeks...so easy to make all the familiar and delicious things...and extremely handy!
I found my original recipe made with Bisquick which I've been saving since 1992. Instead of the 1 cup of Bisquick, substitute 1 cup of your homemade Biscuit Mix.I already lightened up the recipe, even then; by reducing the oil from 1 cup, down to half a cup!

This is a crustless quiche...or pie, whichever you prefer to call it! It is so easy to make, once you have your Biscuit Mix made. Your family will love it, and thank you for it!


Recipe; for Easy Baking Mix...Mix 5 cups of all-purpose flour, 1/4 cup of baking powder and 1 teaspoon salt. Cut in 1 cup of shortening until mixture resembles coarse crumbs. Store in airtight container, in your fridge, or a cool dry place. Makes 6 cups.

Linking to: Hearth and Soul Blog Hop @ Zesty South Indian Kitchen
Enhanced by Zemanta